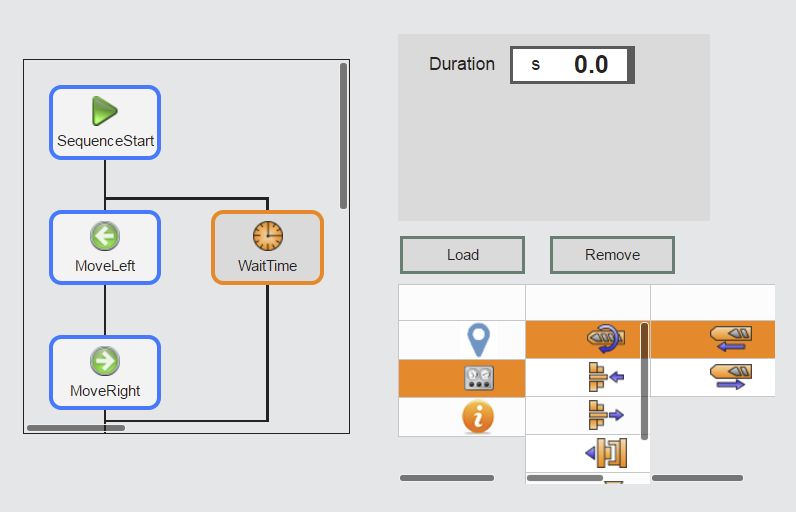
The following shows a sequencer created in the editor using the sequencer widgets.
Adding MpSequence
The first step is to add and configure component MpSequence. A valid MpSequenceCore configuration must also exist.
|
A "Getting started" section is also available for this topic. |
Adding widget "Sequencer"
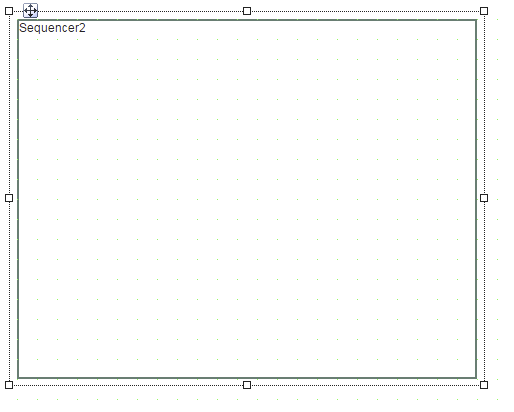
Now the widgets can be added. Widget "Sequencer" is added first to the piece of content. It serves as the contains for the other widgets:
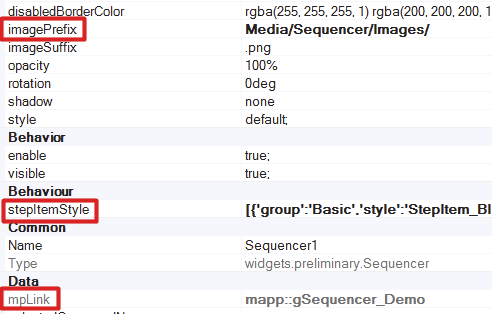
Properties imagePrefix, stepItemStyle and mpLink must be specified. Property imagePrefix defines the location of the images that should be displayed on the steps.
In the MpSequenceCore configuration, the Commands can be divided up into hierarchies. Property stepItemStyle defines which step has which style depending on the hierarchy. For information about specifying the style, see Structure of widget "SequencerStepItem".
The mapp Link of MpSequencer must be specified on mpLink.
Either widget "SequencerEditArea" or widget "SequencerMonitor" can be used in an instance of widget "Sequencer". Using both at the same time is not permitted.
Widget SequencerEditArea is used to edit a sequence. Widget "SequencerMonitor" is used to monitor the sequence currently being executed.
Adding widget "SequencerEditArea"
This example uses widget "SequencerEditArea".
The widget is added on widget "Sequencer".
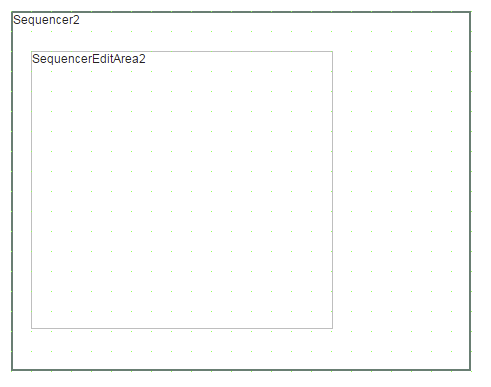
The widget is used to edit the sequence.
Property selectedCommandName must be used to add a step to the sequence at runtime. This property defines which command should be added to the sequence.
Adding widget "SequencerStepItem"
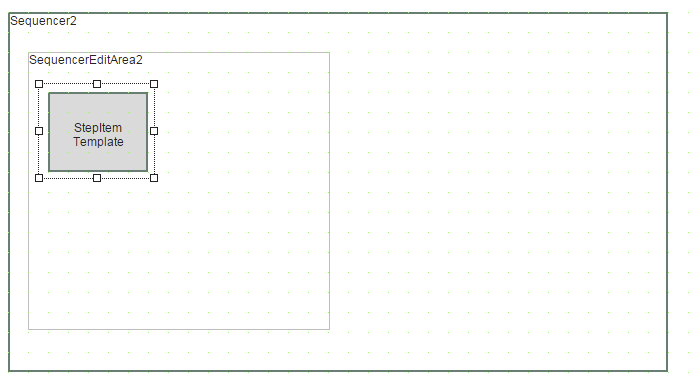
Widget "SequencerStepItem" only has to be added to a "Sequencer" widget once. It is used as a template for all steps in the sequence. The widget is placed in widget "Sequencer". The step will be styled differently depending on the hierarchy in which it is located. This is defined with property stepItemStyle for widget "Sequencer". For more information, see Structure of widget "SequencerStepItem".
Adding widget "SequencerMonitor"
If widget "SequencerMonitor" is used in widget "Sequencer", then widget "SequencerEditArea" cannot be instanced in the same "Sequencer" widget.
The widget is used to display the active steps in the sequence.
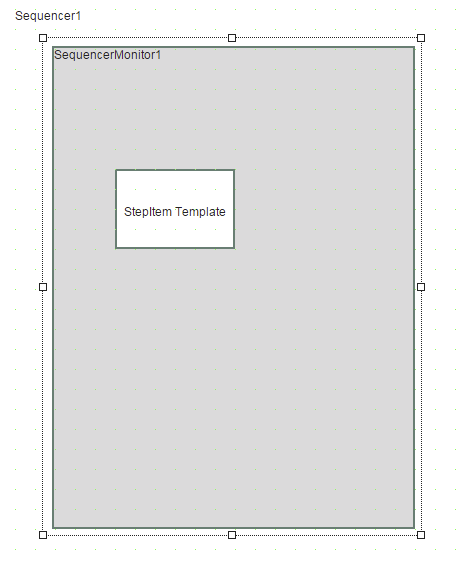
To do so, widget "SequencerMonitor" simply needs to be placed in widget "Sequencer". Widget "SequencerStepItem" must be added in order to show the steps in the sequence:
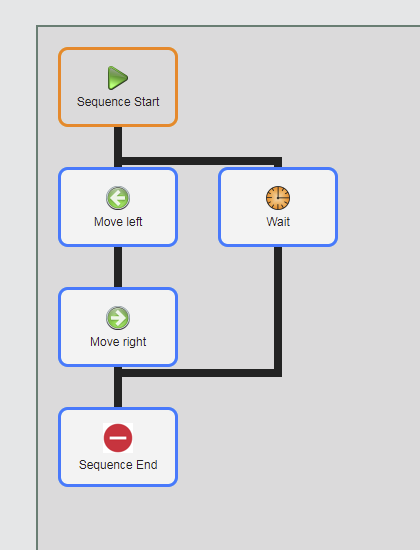
At runtime, the active steps are shown with an orange border in widget "SequencerMonitor". Step "Sequence start" is active in the following example.
Adding widget "SequencerParameterForm"
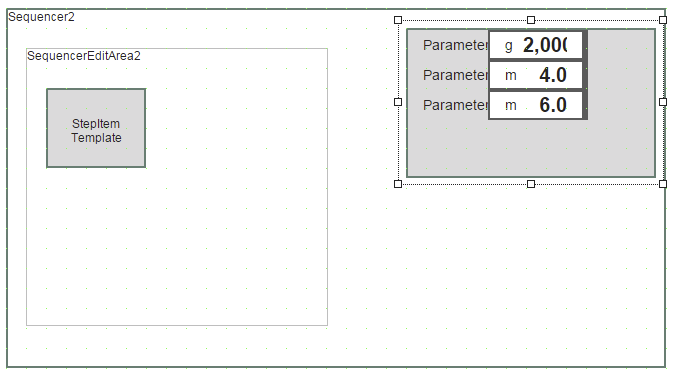
Adding this widget is optional. If Parameter were added in the MpSequenceCore configuration, then they can be edited using this widget. If a step with defined parameters is selected in a sequence, then the parameters will be displayed in the widget automatically. The widget is added on widget "Sequencer". This widget can only be used in combination with widget "SequencerEditArea".
A Button is added to confirm a modified parameter in widget "SequencerStepItemParameterForm". This button can have the following event binding:
<EventBinding>
<Source xsi:type="widgets.brease.Button.Event" contentRefId="SequencerContent" widgetRefId="ParamOk" event="Click"/>
<EventHandler>
<Action>
<Target xsi:type="widgets.brease.SequencerStepItemParameterForm.Action" contentRefId="SequencerContent" widgetRefId="SequencerStepItemParameterForm1" >
<Method xsi:type="widgets.brease.SequencerStepItemParameterForm.Action.Submit" />
</Target>
</Action>
</EventHandler>
</EventBinding>
Adding widget "SequencerItemPopup"
Adding this widget is optional. This widget can be bound using action bindings such that it always appears for the selected step. The widget has the same behavior as widget "GroupBox". This means that any widgets can be added, such as Buttons or widget "SequencerStepItemParameterForm".
The widget is added to widget "Sequencer":
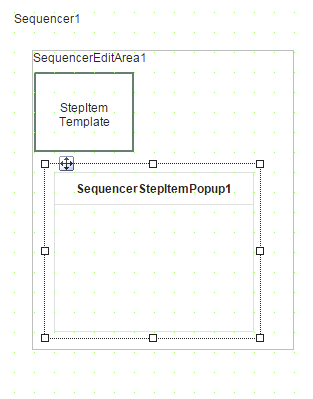
The following binding can be used to always display the popup next to the selected step.
Displaying widget "SequencerStepItemPopup"
<EventBinding>
<Source xsi:type="widgets.brease.SequencerEditArea.Event" contentRefId="SequencerContent" widgetRefId="SequencerEditArea1" event="SelectedStepItemChanged"/>
<EventHandler>
<Action>
<Target xsi:type="widgets.brease.SequencerStepItemPopup.Action" contentRefId="SequencerContent" widgetRefId="SequencerStepItemPopup1" >
<Method xsi:type="widgets.brease.SequencerStepItemPopup.Action.SetVisible" value="=stepSelected" />
</Target>
</Action>
</EventHandler>
</EventBinding>
Hiding widget "SequencerStepItemPopup"
<EventBinding>
<Source xsi:type="widgets.brease.Button.Event" contentRefId="SequencerContent" widgetRefId="ClosePopup" event="Click"/>
<EventHandler>
<Action>
<Target xsi:type="widgets.brease.SequencerStepItemPopup.Action" contentRefId="SequencerContent" widgetRefId="SequencerStepItemPopup1" >
<Method xsi:type="widgets.brease.SequencerStepItemPopup.Action.SetVisible" value="false" />
</Target>
</Action>
</EventHandler>
</EventBinding>
Adding buttons
Buttons are added to add or delete a step in a sequence or to confirm a modified parameter of widget "SequencerStepItemParameterForm". A button is added for each action (delete, add, replace, load, etc.).
Example: "Remove" button
The button is added in a piece of content.
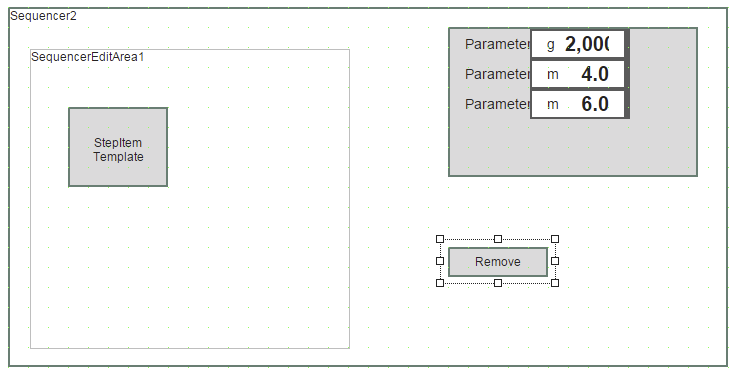
In order for a step to be deleted, an event binding must be created.
<EventBinding>
<Source xsi:type="widgets.brease.Button.Event" contentRefId="SequencerContent" widgetRefId="Remove" event="Click"/>
<EventHandler>
<Action>
<Target xsi:type="widgets.brease.SequencerEditArea.Action" contentRefId="SequencerContent" widgetRefId="SequencerEditArea1" >
<Method xsi:type="widgets.brease.SequencerEditArea.Action.RemoveSelected" />
</Target>
</Action>
</EventHandler>
</EventBinding>
The same principle applies to all other actions.
Selecting and adding commands
Commands can be selected in two ways: single click or using drag-and-drop. If a command should be added using drag-and-drop, then widgets "SequencerTable" and "SequencerTableItemImageList" must be added. For more information about drag-and-drop functionality, see here.
If a command should be added with a single click, then widgets "Table" and "TableItemImageList" are used.
To add the Commands created in the MpSequenceCore configuration to the sequence, widget "SequencerTable"/"Table" must be added to the piece of content. The number of hierarchy levels determines how many tables must be added. Up to 7 hierarchies are permitted to be used. 3 tables must be used if the commands are saved in a hierarchy with 2 levels. The first two are for hierarchy selection, and the third is for selecting the command itself. Since the commands are shown in the form of "images", widget "SequencerTableItemImageList"/"TableItemImageList" is added for each "SequencerTable"/"Table" widget. This means that 3 "SequencerTable"/"Table" widgets must be added. One "SequencerTableItemImageList"/"TableItemImageList" widget is used for each "SequencerTable"/"Table" widget.
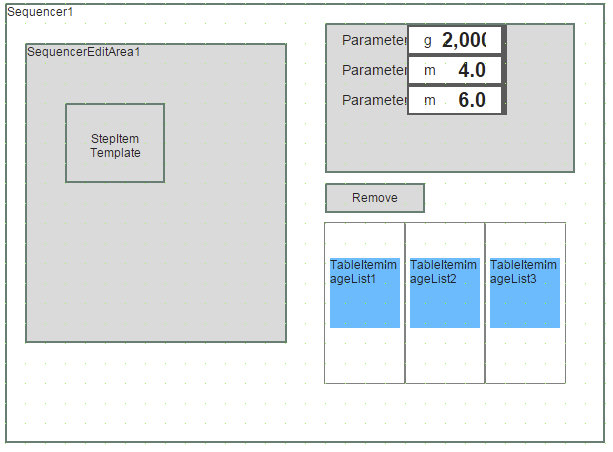
General settings
Property imagePrefix for widget "SequencerTableItemImageList"/"TableItemImageList" defines where the images to be used are stored. For more information, see Specifying images.

The images specified in the path above must have the same names as the Commands specified in the MpSequenceCore configuration!
In order for the correct Commands or groups to be displayed as images, the following principle is used:
Widget "Sequencer" sends widget "SequencerTableItemImageList"/"TableItemImageList" a list of images ([Image1.png, Image2.png]) and an array of numbers that define which images are displayed in the table cells.
Image "Image1" is shown in table cell 0 (index 0), while "Image2" is shown in the next table cell (index 1). If an image in the table is selected, then widget "SequencerTableItemImageList"/"TableItemImageList" transmits the index of the selected image back to widget "Sequencer" (1).
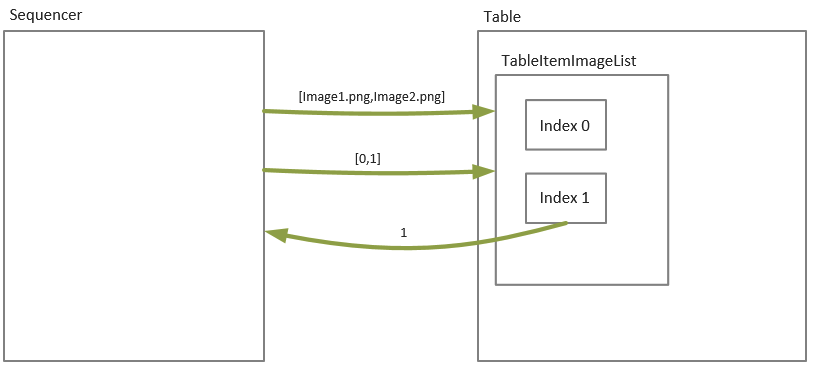
Event bindings must be added in order to implement this principle.
This example shows how the list of images is sent from widget "Sequencer" to widget "SequencerTableItemImageList"/"TableItemImageList".
<EventBinding>
<Source xsi:type="widgets.brease.Sequencer.Event" contentRefId="SequencerContent" widgetRefId="Sequencer1" event="ImageListChanged"/>
<EventHandler condition="level = 0">
<Action>
<Target xsi:type="widgets.brease.TableItemImageList.Action" contentRefId="SequencerContent" widgetRefId="TableItemImageList0" >
<Method xsi:type="widgets.brease.TableItemImageList.Action.SetImageList" imageList="=imageList" />
</Target>
</Action>
</EventHandler>
<EventHandler condition="level = 1">
<Action>
<Target xsi:type="widgets.brease.TableItemImageList.Action" contentRefId="SequencerContent" widgetRefId="TableItemImageList1" >
<Method xsi:type="widgets.brease.TableItemImageList.Action.SetImageList" imageList="=imageList" />
</Target>
</Action>
</EventHandler>
<EventHandler condition="level = 2">
<Action>
<Target xsi:type="widgets.brease.TableItemImageList.Action" contentRefId="SequencerContent" widgetRefId="TableItemImageList2" >
<Method xsi:type="widgets.brease.TableItemImageList.Action.SetImageList" imageList="=imageList" />
</Target>
</Action>
</EventHandler>
</EventBinding>
This example defines which image is displayed at which table index.
<EventBinding>
<Source xsi:type="widgets.brease.Sequencer.Event" contentRefId="SequencerContent" widgetRefId="Sequencer1" event="SelectedIndexChanged"/>
<EventHandler condition="level = 0">
<Action>
<Target xsi:type="widgets.brease.TableItemImageList.Action" contentRefId="SequencerContent" widgetRefId="TableItemImageList0" >
<Method xsi:type="widgets.brease.TableItemImageList.Action.SetSelectedIndex" >
<Arguments>
<selectedIndex>
<types:Expression>selectedIndex</types:Expression>
</selectedIndex>
</Arguments>
</Method>
</Target>
</Action>
</EventHandler>
<EventHandler condition="level = 1">
<Action>
<Target xsi:type="widgets.brease.TableItemImageList.Action" contentRefId="SequencerContent" widgetRefId="TableItemImageList1" >
<Method xsi:type="widgets.brease.TableItemImageList.Action.SetSelectedIndex" >
<Arguments>
<selectedIndex>
<types:Expression>selectedIndex</types:Expression>
</selectedIndex>
</Arguments>
</Method>
</Target>
</Action>
</EventHandler>
<EventHandler condition="level = 2">
<Action>
<Target xsi:type="widgets.brease.TableItemImageList.Action" contentRefId="SequencerContent" widgetRefId="TableItemImageList2" >
<Method xsi:type="widgets.brease.TableItemImageList.Action.SetSelectedIndex" >
<Arguments>
<selectedIndex>
<types:Expression>selectedIndex</types:Expression>
</selectedIndex>
</Arguments>
</Method>
</Target>
</Action>
</EventHandler>
</EventBinding>
This example shows how information from the selected image is sent from widget "TableItemImageList" to widget "Sequencer".
<!--Table0-->
<EventBinding>
<Source xsi:type="widgets.brease.TableItemImageList.Event" contentRefId="SequencerContent" widgetRefId="TableItemImageList0" event="SelectedImageIndexChanged"/>
<EventHandler>
<Action>
<Target xsi:type="widgets.brease.Sequencer.Action" contentRefId="SequencerContent" widgetRefId="Sequencer1">
<Method xsi:type="widgets.brease.Sequencer.Action.SetSelectedImageIndex" level="0" selectedImageIndex="=imageIndex"/>
</Target>
</Action>
</EventHandler>
</EventBinding>
<!--Table1-->
<EventBinding>
<Source xsi:type="widgets.brease.TableItemImageList.Event" contentRefId="SequencerContent" widgetRefId="TableItemImageList1" event="SelectedImageIndexChanged"/>
<EventHandler>
<Action>
<Target xsi:type="widgets.brease.Sequencer.Action" contentRefId="SequencerContent" widgetRefId="Sequencer1">
<Method xsi:type="widgets.brease.Sequencer.Action.SetSelectedImageIndex" level="1" selectedImageIndex="=imageIndex"/>
</Target>
</Action>
</EventHandler>
</EventBinding>
<!--Table2-->
<EventBinding>
<Source xsi:type="widgets.brease.TableItemImageList.Event" contentRefId="SequencerContent" widgetRefId="TableItemImageList2" event="SelectedImageIndexChanged"/>
<EventHandler>
<Action>
<Target xsi:type="widgets.brease.Sequencer.Action" contentRefId="SequencerContent" widgetRefId="Sequencer1">
<Method xsi:type="widgets.brease.Sequencer.Action.SetSelectedImageIndex" level="2" selectedImageIndex="=imageIndex"/>
</Target>
</Action>
</EventHandler>
</EventBinding>
A widget-widget binding is required in order to add a command selected in the table to the sequence. This is done by binding property selectedCommandName of widget "Sequencer" to property selectedCommandName of widget "SequencerEditArea":
|
|
Loading and saving sequences
A Button must be added in order to load the sequence at runtime. This is placed in the piece of content.
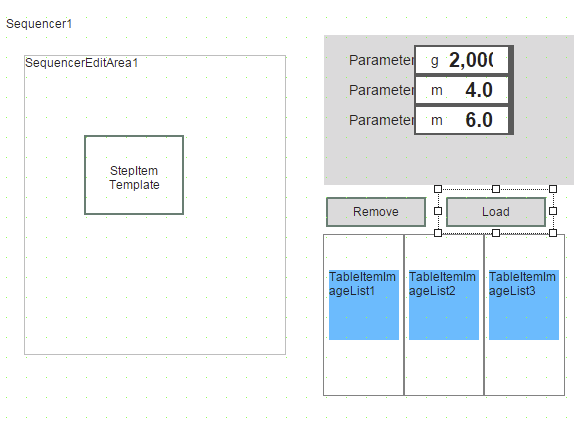
An event binding is required in order for the sequence to be loaded. The name of the sequence being load must be specified under "name". Sequence "SequenceDemo.xml" is loaded in this example.
<EventBinding>
<Source xsi:type="widgets.brease.Button.Event" contentRefId="SequencerContent2" widgetRefId="Load" event="Click"/>
<EventHandler>
<Action>
<Target xsi:type="widgets.brease.Sequencer.Action" contentRefId="SequencerContent2" widgetRefId="Sequencer1" >
<Method xsi:type="widgets.brease.Sequencer.Action.LoadSequence" name="SequenceDemo.xml"/>
</Target>
</Action>
</EventHandler>
</EventBinding>
If the sequence should be saved, this can also be done using a Button. The following event binding can be made:
<EventBinding>
<Source xsi:type="widgets.brease.Button.Event" contentRefId="SequencerContent" widgetRefId="SaveActive" event="Click"/>
<EventHandler>
<Action>
<Target xsi:type="widgets.brease.Sequencer.Action" contentRefId="SequencerContent" widgetRefId="Sequencer1" >
<Method xsi:type="widgets.brease.Sequencer.Action.SaveSequence" name="NewSequence"/>
</Target>
</Action>
</EventHandler>
</EventBinding>
