This section explains how to use widget UserList in the browser.
•The following functionalities of the mapp component can be executed by widget UserList:
•Listing current users if the user is an administrator
•Deleting users
•Adding users
•Editing users
•Filtering and sorting the list by name, full name, status, etc.
To edit a user, the logged-in user must have administrator role mpUserX. For additional information, see here.
Deleting users
To delete a user, action "DeleteUser" can be used.
The action can be performed by clicking on a button. In this example, button "Delete user" was added:

The following event binding can be used for the button:
<EventBinding>
<Source xsi:type="widgets.brease.Button.Event" contentRefId="MyContent" widgetRefId="Button_deleteUser" event="Click" />
<EventHandler>
<Action>
<Target xsi:type="widgets.brease.UserList.Action" contentRefId="MyContent" widgetRefId="MyUserList" >
<Method xsi:type="widgets.brease.UserList.Action.DeleteUser" />
</Target>
</Action>
</EventHandler>
</EventBinding>
The desired user must first be selected in widget UserList, which is displayed. The selected user can then be deleted using button "Delete user".
Adding users
To add a user, action "OpenAddUserDialog" can be used.
The action can be performed by clicking on a button. In this example, button "Add user" was added:

The following event binding can be used for the button:
<EventBinding>
<Source xsi:type="widgets.brease.Button.Event" contentRefId="MyContent" widgetRefId="Button_openAddUserDialog" event="Click" />
<EventHandler>
<Action>
<Target xsi:type="widgets.brease.UserList.Action" contentRefId="MyContent" widgetRefId="MyUserList" >
<Method xsi:type="widgets.brease.UserList.Action.OpenAddUserDialog" />
</Target>
</Action>
</EventHandler>
</EventBinding>
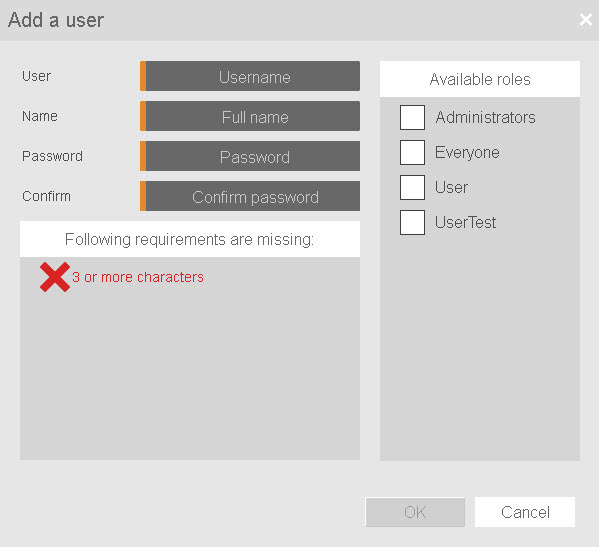
Clicking button "Add user" opens a dialog box. In this dialog box, the following entries must be made to add a new user:

User: The username of the new user
Name: This specification is optional. The full name of the user can be specified.
Password: The password for the new user
Confirm: The same password must be entered again for confirmation.
Roles
The available roles are displayed at the right edge of the dialog box. The desired role can be selected here.
It is also possible to select multiple roles for a new user.
If no role is selected, role "Everyone" is automatically assigned to the new user.
Password guidelines
The password guidelines are displayed at the bottom of the dialog box.
The guidelines that are already met are marked green, and those that are not yet met are marked red.
The password guidelines that must be met are defined in the MpUserX configuration.
If the entry is confirmed via the OK button, the dialog box is closed and the new user is added to the list.
Editing users
To edit a user, action "OpenModifyUserDialog" can be used.
The action can be performed by clicking on a button. In this example, button "Modify user" was added:

The following event binding can be made:
<EventBinding>
<Source xsi:type="widgets.brease.Button.Event" contentRefId="MyContent" widgetRefId="Button_openModifyUserDialog" event="Click" />
<EventHandler>
<Action>
<Target xsi:type="widgets.brease.UserList.Action" contentRefId="MyContent" widgetRefId="MyUserList" >
<Method xsi:type="widgets.brease.UserList.Action.OpenModifyUserDialog" />
</Target>
</Action>
</EventHandler>
</EventBinding>
The desired user must first be selected in widget UserList, which is displayed. A dialog box can then be opened using button "Modify user".
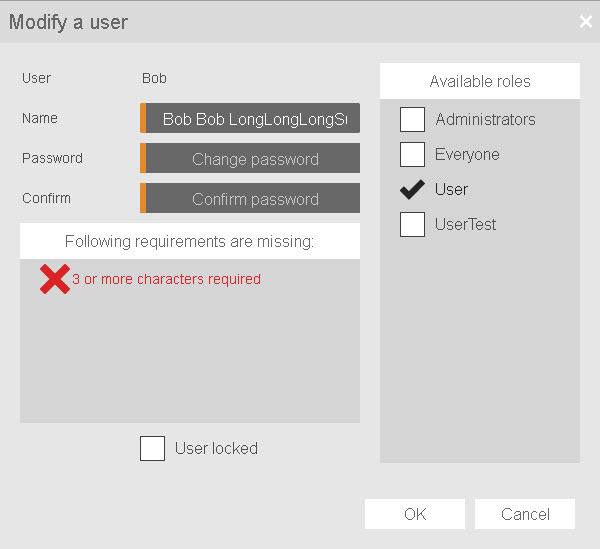
In this dialog box, the following adjustments can be made to the selected user:

User: The username cannot be changed.
FullName: The full name can be changed.
Reset password: If button "Reset password" is pressed, two new input fields appear. A new password for the selected user can be entered in these fields. To confirm the new password, the password guidelines must be met.
The role can be adjusted at the right edge.
Button "User locked" can be used to lock or unlock the user.
If the adjustments are confirmed via the OK button, the dialog box is closed and the changes are saved.
Filtering and sorting users
Users can be filtered by name, status, etc. via the search bar at the top right of the widget.

The user list can be sorted by clicking on the desired column name. Depending on how often it is clicked, the users are sorted alphabetically or by column type.
Error handling
If an error occurs when using widget UserList (e.g. action is not successful), the error can be read out using events "OnError", "UserModified" or "UserAdded". Depending on where the error occurs, one of these events can be used.
Additional information is also available in the Logger. This information is entered by the MpUserX configuration.